


Learn How To Do Tv wall mounting in (8 easy steps)
- tvpro420
- Aug 9, 2022
- 6 min read

Complete Your Tv Wall Mounting Without Any Hassle.
Learning how to do Tv wall mounting will give you the ability to make one of the biggest upgrades to your home theatre (besides buying a new TV or fancy sound system). Mounting the TV on the wall brings a number of advantages, from a cleaner aesthetic design to better ergonomics for a more pleasant viewing experience.
It's also super affordable, with lots of great mounting options. Whether you have a simple tilting wall mount or a fully articulated dual-arm mount that provides a full range of motion and positions, the basics of installing this hardware are essentially the same.
It's also super affordable, with lots of great mounting options. Whether you have a simple tilting wall mount or a fully articulated dual-arm mount that provides a full range of motion and positions, the basics of installing this hardware are essentially the same.
From the prep work to the installation itself, here's a step-by-step guide on how to mount a TV on the wall.
- Check out the best TVs we've reviewed.
- How to track birds with a security camera and smart display.
- Here is What you'll need:
In addition to the TV and the wall, you will need to have a few things on hand to properly mount the TV.
Paper template (optional)
Pencil or masking tape
Tape measure
Nail finder
Level
Electric drill with drill bit
Phillips or flat screwdriver
TV holder
Including mounting material (screws, spacers, etc.)
You'll need an extra pair of hands to help you lift and position the TV, and maybe a second person to help you get the position right.
Here Are Some Notes On Handling TVs:
Take it from a guy who has personally unpacked and set up dozens and dozens of TVs - you need someone else to help you. While smaller TVs can be handled by one person, anything over 50 inches should be moved and lifted by two people. Although one person can lift the weight, the size and shape of the TV make it impractical and care must be taken not to damage the display. Assembling a broken TV takes all the fun out of it.
You'll want to take extra care to protect the display panel when handling the TV. A large sheet of glass or plastic will naturally have some flexibility, but the underlying display technology usually does not. Even a small unintentional bend or pressure on the panel can irreparably damage the TV. (Again, take that from a guy who's broken a few TVs over the years.)
To properly lift and carry the TV, you must allow the TV chassis to support the display. Lift from the bottom of the TV and support it at the side or top corners so that the TV is vertical, in the same position as it would be in normal use. This is the ideal position for the TV as the chassis bears all the weight and pressure. Try not to lean to one side or the other, as the thinnest TVs can actually bend under their own weight enough to damage the display.
When laying the TV flat, place it screen-side down on a large, flat surface covered with a clean, soft blanket or rug. Any stray objects or debris can scratch the screen or frame, so make sure it's really clean!
You want a surface that will evenly support the entire flat front of the TV without any uneven parts that would put extra pressure on any one spot or leave one side of the TV unsupported.
Very carefully place the TV on the bottom edge and gently tilt it forward, lower it on a soft surface, hold the top corner and the middle of the side to support the TV evenly, be careful not to twist it unnecessarily. or pressure on the panel.
How To Mount A TV To The Wall
Once you have everything you need and have planned the basics like where you want to place the TV and understand how the TV mount is assembled, you are ready to mount the TV. It's a fairly simple process, but getting it right will make the difference between an attractively mounted TV and one that may not fit properly or even damage the TV.
1. Firstly Find The Studs

Once you've settled on the perfect spot on the wall, you'll need to find the pins to properly attach the bracket. Tv wall mounting to studs provides the structural strength necessary to support a TV that can weigh anywhere between 30 and 100 pounds. Drywall alone won't support this kind of weight, so it's essential that you anchor the TV mount to studs.
Finding a stud location is as simple as using a cheap stud finder or other means of finding a stud location. Measure the Tv wall mounting points on the TV mount to determine how many pins you need to find. For most this will be a span of two bolts, one for the left and one for the right. Depending on the specifics of your walls and the TV mount you choose, you may need to have a three post span. You can lightly mark the location of the studs on the wall with a pencil.
2. Secondly Mark The Hole Position
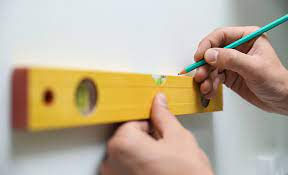
Next, you will need to specifically mark the place where you plan to screw into the wall. Ideally, you will use a spirit level to ensure that these marks are not only even between the two pins, but also to ensure that the amount is not skewed. You can mark the specific places for the guide holes on the wall itself with a pencil, or you can cover the intended Tv wall mounting location with paper, either using a pre-printed template or mark the template yourself.
3. After That Double Check The Bracket Position

With your signs in place, it's time to place the Tv wall mounting bracket on the wall. First, place the bracket flat against the wall and line up one screw location with the first hole marked. Hold this point firmly and rotate the other side of the bracket as needed to line up with the other hole. Use a spirit level to check that the bracket is level when aligned with the planned pilot holes.
4. Drill Pilot Holes

Using a drill, you will need to drill pilot holes through the drywall and into the studs in the correct positions.
5. Mount The Wall Bracket

After drilling the guide holes, use the included Tv wall mounting screws to attach the wall bracket. Using an electric drill, screwdriver, or ratchet, drive in the wall screws to securely attach the bracket to the wall, with the screws engaging the studs.
Generally speaking, you'll want the screws to be tight enough to hold the bracket tight to the drywall without wobbling or rattling the Tv wall mounting plate. If the screws dig into the drywall or the bracket deforms in any way, you've over-tightened.
With a properly positioned wall mount, you are more than halfway done Tv wall mounting your TV.
6. Attach The TV Mounting Plate

Next, you attach the Tv wall mounting plate to the TV. This is the other half of the TV bracket that attaches to the back of the TV and then connects to the wall mount to securely hang the TV on the wall. Depending on the type of mount you use, the two halves can be attached with a simple clip, a rail system, or even an extension arm.
Align the TV mounting plate with the VESA mounting holes on the back of the TV cabinet. Using the supplied screws that should come with the TV mount, attach the mounting plate to the TV using a screwdriver.
Be especially careful not to overtighten the screws, which could result in damage to the TV chassis or the stripped screw heads, which can cause real problems with mounting (or later dismounting) the TV. A good rule of thumb is to tighten the screw to hold the bracket snug against the chassis, then tighten a quarter turn.
7. Attach The TV Mounting Plate To The Wall Bracket

With the wall mount and TV mounting plate securely in place, all that remains is to connect the two.
Start by raising the TV to the correct height or slightly higher than the intended position to lower the TV and attach the bracket and plate.
In some cases this will be a plug-in connector with security screws that can be tightened after connection, but others will use extensions that can snap or screw into place. Be sure to read the instructions that came with the TV mount and use the supplied hardware to attach the board to the mount.
Be careful when lifting the TV and pay special attention to hold the TV by the outer bezels, not the glass. Be especially careful not to grab or push the screen, which can damage the display very easily.
Once the amount is properly attached, you can allow the mount to support the weight of the TV.
8. Reconnect The TV

At this point, all that remains is to reconnect the power to the TV and any other devices that may need to be plugged in. Once this is done, you can go back and enjoy your newly installed TV.
Comments